Showing posts with label Nature Games. Show all posts

Sunday, 7 October 2018

How to have an Eco-Friendly Autumn


Leaves, the temperature and rain are falling. Summer has gone and autumn is here. As the season changes read on to find out how you can make your autumn Eco-friendly.

Eco-friendly autumn


How to have an Eco-Friendly Autumn


1. Clothes


It can be all too easy to buy new clothes for the new season but even sustainable fashion items come with a cost to the environment, especially if you don't actually need any new items.  First of all head to your wardrobe and see what you already have.
  • Get out your sewing machine and re-purpose existing clothes into new ones.
  • Make your own clothes - learn to knot, sew or crochet.
  • Get together with a group of friends and have a clothes swap party.
  • If you do need new clothes then buy "new to you" from second hand stores and online.
  • If buying totally new go for quality clothes made from natural materials in a timeless style that will last the test of time.
  • If you have clothes you really don't want and can't give to friends downgrade them to something else such as cleaning cloths. T-Shirt bags or use them in the garden to protect plants.  This post has 7 ideas to keep clothes out of landfill.

Tuesday, 19 August 2014

Seed Pictures

Posted by Rosie

In the sixth of our series of nature games and activities for children today we have:

Seed Pictures


For this activity you need a selection of seeds that use use to create a picture of your choice.  You can either add the seeds onto a template or build up your own image.

Robin pictures made with seeds


To make Seed Pictures you will need:

  • A selection of seeds
  • Paper or cardboard
  • PVA Glue
  • Paintbrush  
  • Toothpick and/or tweezers
  • Paper or cardboard
  • Black and white templates (optional) 

Seeds from your kitchen - soup mix, red lentils, aduki beans, split peas, quinoa, soya beans

Method


  • Collect together your seeds - if they are gathering from outside and they are are wet you will need to dry them.  If collecting seeds is not an option or you need more, you can use seeds left over in garden seed packets or you can raid the kitchen cupboards - suitable seeds include dried beans, lentils, rice, pumpkin, sunflower, chickpea, spice seeds, poppy seeds etc.
  • Find and print off a template if you are using one.  I went to Google, typed in robin and searched under black and white plus line drawings ... be warned though, in this instance I had to trawl past a lot of batman type Robins first!
  • Add glue with a paintbrush to the first the part of the picture you want to add the seeds to.  
  • Add the seeds.  Large seeds can be added individually and smaller seeds poured on.  Seeds can be pushed gently into place with a toothpick or placed more accurately with tweezers. Once this is completed, shake excess seeds off the dry areas move to the next section.  I would not recommend adding lots of glue in one hit as seeds easily get dropped and land in the wrong place.  
  • Continue until the whole picture is filled in with seeds.


Seed robin by P, aged 3

Do let me know of you have a go at making seed pictures and I'd love to see your masterpieces.  You can either post them up on Twitter linking to me at @greenrosielife or pop them on our Facebook page.


For more children centred activities why not head on over to Let Kids be Kids and see what other children have been playing at this week.  You can also see all the nature games and activities we have detailed so far by clicking here.

Tuesday, 22 July 2014

Animal Leaf Pictures

Posted by Rosie

In the fifth of our series of nature games and activities for children today we have:

Animal Leaf Pictures


This activity involves going for a walk to collect a variety of leaves of different shapes and colours before returning home to create an animal picture with them.

Leaf Mouse


To make Animal Leaf Pictures you will need:


  • A selection of leaves of different shapes, sizes and colours
  • Glue (PVA is best)
  • Paintbrush
  • Paper or cardboard
  • Laminating sheets (optional)
  • Animal pictures for inspiration (optional)


Method


  • First head out to collect your leaves, which is best done on a dry day.  Autumn will give a better range of colour but even in Spring and Summer you'll be surprised how many different coloured leaves there are once you start really looking.
  • Collect a good range including really small ones for eyes, long thin ones for legs and big round ones for bodies. Long thin leaves with a serrated edge make excellent feathers!
  • Once back home assemble your materials and start making your animals.
  • You may want to copy a picture from a book or the internet or be happy to go freestyle!
  • For younger children you can draw or print off an animal outline for them to fill in.
  • Be as adventurous as possible, building up layers of leaves for features such as eyes, spots on butterflies, scales of fish etc.

Note - if you want you can dry and press the leaves first although I have never bothered with this stage.  Another option is to make your pictures on paper and then laminate them for posterity.


Book - Look What I Did with a Leaf!


For this activity I got my inspiration from the book, "Look What I Did with a Leaf!" by Morteza E. Sohi.  If you head over to Amazon you can have a peek inside at some of the leaf animals in the book.

Do let me know of you have a go at making animal leaf pictures and I'd love to see your pictures.  You can either post them up on Twitter linking to us at @ecogiteslenault or pop them on our Facebook page.

ANIMALTALES


Tuesday, 8 July 2014

Natural Paintbrushes

Posted by Rosie

In the fourth of our series of nature games and activities for children today we have:

  Natural Paintbrushes


What child does not like painting so why not make things a bit different and make your own paintbrushes out of natural materials.  

Natural paintbrushes

To make and paint with natural paintbrushes you will need:

  • A selection of natural materials that you might be able to use to make paintbrushes - eg grass, leaves, wool, feathers, flowers etc.
  • Straight sticks for paintbrush handles
  • String, sellotape or other natural binding materials
  • Paints and paper

A selection of natural materials for making paintbrushes


In the top picture the brushes are made from:

Top - Large stem of dead plant (umbellifer) and rosemary leaves secured with a strip off a piece of rhubarb
Middle - Elder stem and grass secured with tape
Bottom - Stick with the bark stripped off and hay, secured with tape

How you continue this activity is really up to you.  Options include:

  • Use the materials you have collected as they are to paint or print pictures
  • Bind the natural materials to the sticks to make paintbrushes and make pictures
  • Compare the different paintbrushes to see the effects they make
  • Discuss which brushes worked well and which ones did not
  • Try to recreate a famous painting with your natural paintbrushes
  • Ask your children what materials they most like painting with
  • Talk about what bought paintbrushes are made from and whether they are better or worse than the natural paintbrushes

Paintings made with natural paintbrushes

Of the 3 paintbrushes Tom, Ben and I made (top picture) the hay one was not ideal as bits of hay kept falling out; the grass one was a bit difficult to control but the rosemary one was the best once we had shortened the length of the "brush".

Do let us know if you  have make some masterpieces with natural paintbrushes - you can always post your pictures on our Facebook page

Tuesday, 24 June 2014

Nature's Rainbow

 Posted by Rosie

In the third of our series of nature games and activities for children today we have:

  Nature's Rainbow


This is an art and literary nature activity which stimulates children's imagination and gets them looking closely at all the natural colours around them.


For Nature's Rainbow you will need:


  • A copy of the story of Rainbow-Land (below)
  • Some double sided tape (carpet tape is great as it is quite wide) and a piece of card 
  • Something  to collect petals etc in
  • Somewhere to collect petals etc.

Before you start stick some double sided tape on a small piece of card.  The card needs to be about 15 x 10 cm and the tape about 10 x 5 cm. 

Nature's Rainbow involves telling the story of "Rainbow-Land".  After the children have heard how without the Rainbow there are no colours they go out to collect colourful natural materials to recreate their own Rainbow.


The Story of Rainbow-Land


In Rainbow-Land everything was beautifully coloured and it was all thanks to the magnificent rainbow that filled the sky every single day.  Each morning the King and Queen of Rainbow-Land would open their sumptuous red velvet curtains and look out over the town below.  They would see the market stall owners setting out their wares.  There was Mrs Plum, the fruit seller who had oranges more orange than you have ever seen and the greenest of green apples.  Next to her was Mr Tulip, the flower seller and I can tell you, his sunflowers were the yellowest you will ever have seen and as for his roses - sooooo red!!  Because of all the bright colours everyone in Rainbow-Land was always happy and it was a wonderful place to live.

One night thought there was a TERRIBLE storm.  Everyone cowered inside as the rain lashed against the windows and the wind howled as it seemed to be pick up everything outside and be throwing it around.  It was the worst storm there had ever been in Rainbow-Land.

The following morning all was once again calm but all was not right.  As the King and Queen looked out of the window they were me with an awful sight.  There was NO COLOUR!  Everything was just grey.  No reds, no blues, nothing.  And far, far away on the horizon they could see the shattered remains of their rainbow, smashed into a million pieces by the storm.

What were they to do?  Their trusted advisers could not think of a solution and they really felt that all was lost.  However a young orphan girl who worked in the kitchens came up with an idea that the rest of the staff thought might just work and so the cook brought her up to tell it to the King and Queen.  She suggested that if everyone in Rainbow-Land worked together to gather up all the pieces of the rainbow they could stick them together and rebuild it.

No-one could tell whether this would work or not but everyone agreed it was their best chance.  They worked all through the day and on into the night, gathering and sticking the pieces together.  At dawn, just as the sun was rising above the Eastern horizon the last piece was dropped into place and as the morning light spread across Rainbow-Land, with it came the colours they all knew so well.

It is said that the little orphan girl grew up to be one of the greatest advisers in the Land - I do not know if this is true or not but I do know I would love to create my own piece of Rainbow-Land, right here and now. Wouldn't you?

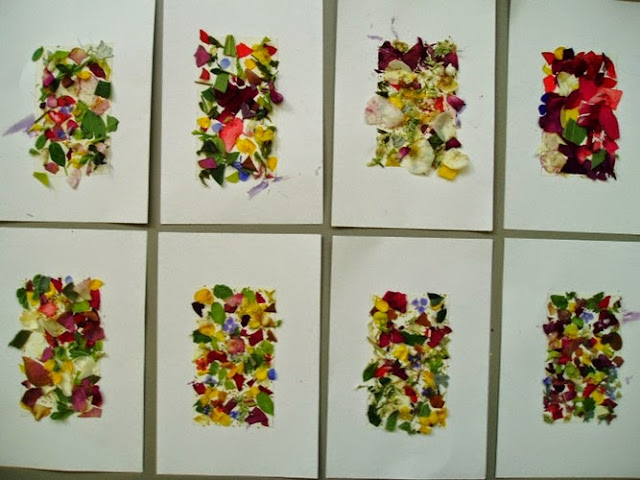
At the end of the story ask if the children think they could help the children in the story to create their own rainbow.  Show them a pictures of the rainbows here on our blog, explaining how it is made of natural materials and if they were to collect colourful things they could make one too!

Head off and collect natural materials such as petals, leaves, berries etc.

Bring these back to where you want to create your rainbow and spread them out.  You may then want to remind children of the colours of the rainbow, which I always remember as:

Richard - Red
Of - Orange
York -Yellow
Gained - Green
Battle - Blue
In - Indigo
Vain - Violet

If any colours seem to be missing you can head out again to look for them.

Remove the backing  paper from the tape (if it is carpet tape be aware that it is now VERY sticky!).  Then ask the children to tear the natural materials into small pieces and stick them onto the sticky area to make their own rainbow, either in strips of colour for older children or randomly for younger ones.  You can either use all one type of petal or leaf etc for one colour or add a mixture.


And there you have it - a Rainbow made from natural materials that will bring colour into anyone's life!  They are great made into greetings cards or en masse make a lovely wall display.


Do let me know if you have a go at this activity.  Summer and Autumn are good times to do it but you can still do it in the winter or without natural materials by tearing the colours from plant pictures in a magazine.

For more Nature Games and Activities you might like to try please do look here:

Nature Activities
Writing Bubble

 photo letkidsbekidslogobadge_zps424b7d61.jpg

Tuesday, 10 June 2014

The Un-Nature Trail

Posted by Rosie

In the second of our series of nature games and activities for children today we have:

The Un-Nature Trail


This activity helps children develop good observation skills and can be a good way to introduce them to the concepts of man-made v natural and camouflage.  It's also great fun!

You will need to collect a range of small man-made objects that can be hidden outside.  Good examples include a small toy car or Lego, a bulldog clip, a hair scrungy, a pencil, a keyring etc etc - having things you can hang up is good too.  For younger children you may first need to help them understand the difference between something man-made and something natural.

Suitable Un-Nature Trail Objects

Arrange the items along a set trail in the garden (or park/local woodlands) hiding them both on the ground and up in the trees/bushes.  Make sure some are easy to find and others are more hidden or camouflaged.  If you have a small mirror, preferably without a frame, this can be hidden in grass such that it is almost impossible to see.  Make sure you remember where it is though!

Explain to your children that there are a number of man-made items along the trail, but do not tell them how many.  Ask them to walk the trail seeing how many they can find.  Generally they see the most obvious ones but need to be sent back again to look more closely for others.  Once they have had a couple of goes take them along the trail and then show them where all the items are. I used to save the mirror until last and listen to the oohs and ahhs of how well hidden it was in the grass!  I also have an old green scrungy that just seems to disappear when placed in a tree with leaves of a similar colour - great camouflage!


School children on an Un-Nature Trail

Depending on the ages of the children you may want to leave it there or spend some time talking about this activity in more detail.  Good questions to start a discussion include:

  • Why do animals need to be camouflaged?
  • Name some very well camouflaged animals
  • Why are some animals brightly coloured ie ladybirds?  (They use the fact they taste horrible rather than camouflage to protect themselves)
  • Are any animals able to change their looks to fit in with their surroundings?  Chameleons and some flatfish can and the Pepper Moth has over a number of years adapted it's wing colour from pale to dark and back to pale in presence to the soot deposits on trees before, during and after the Industrial Revolution. 
  • Humans are not camouflaged - how do we protect ourselves?
  • Why are both predators and prey camouflaged?

You could also print off some animal pictures for children to colour and camouflage or head back out and see what camouflaged animals you can find.  

Do let us know if you have a go at doing this activity.  What items were really hard for the children to find and do some children have better observational skills than others?  In the wild they were more likely to be the survivors.

 photo letkidsbekidslogobadge_zps424b7d61.jpg

Monday, 2 June 2014

Nature's Treasure Hunt


In the years BC (Before Children) I worked with school children in their school grounds.  I used to do a large number of nature based games and activities and I would love to share these with you now.  Over the next few weeks I'll add some of my favourites onto the blog so you and your children can have the fun that the thousands of children I worked with over they years also had.  Today I am offering you:

Nature's Treasure Hunt

Child with a basket in a garden


Copy and print the list below, give your children a small box or bag and send them out on a Treasure Hunt with a difference.  Tell them that whilst they may be able to find some things easily (a feather for example) other things maybe somewhat harder.  After all there are not many dinosaurs to be had these days!  This is where their imagination comes into play.  They need to find something that makes them think about a dinosaur ... I think you may be quite surprised at their ingenuity and lateral thinking.  Ask your children to only collect only natural things that you can return safely and without damage. Let them be as imaginative as possible but set any ground rules you might want i.e. do not cut ALL the flowers in the garden!

For younger children you can make the list shorter or adapt some of the items and work with them to read the list and search for things.

Give your children enough time to find a good number from the list and at the end sit down and go through their finds with them.  You could then use them as the basis for a nature table or return them back to Nature.

Nature's Treasure Hunt - The List.

Green Leaf, Sycamore
A Sycamore leaf ... or is it a dinosaur's footprint?
Green grass, suntrap, natural
Is grass important in Nature?

1. A feather
2. One seed dispersed by the wind
3. Exactly 50 of something
4. A sycamore leaf
5. A thorn
6. Three different kinds of seed
7. A dinosaur
8. Something round
9. Something fuzzy
10. Something beginning with the letter M
11. A chewed leaf (not by you!)
12. Something beautiful
13. A rainbow
14. Something white
15. A badger
16. Something that makes a noise
17. Something important in nature
18. Something dead
19. Something very old
20. Something totally straight
21. A sun trap *
22. A fairy
23. Fire
24. A blue flower
25. A cloud
26. A big smile

* - this is a leaf that traps the energy from the sun to make food for the plant ;)  

Do let me know if you do this and whether your children came up with any very interesting or particularly imaginative finds.  Happy Searching!